Sunday, March 4, 2012

Amazing Delicious Fried Noodles!


These noodles are yummy enough to make you cry. I was having a wicked noodle craving and I didn't want noodles with peanut sauce (too rich), and I did not have any ready-made sauce around. What evolved was fantastic! You will need:

2 tbsp sesame seeds (I use black sesames, but use whatever you want- almonds would probably be yummy too)
Soy sauce to taste
1 tbsp cooking oil of your choice (toasted sesame oil is probably best, but it's expensive and safflower oil fries just as well)
1 package extra firm tofu, pressed and cut into bite sized pieces
1 package soba or whole wheat fettucini noodles
1 large onion, chopped
3 cloves garlic, diced
3 carrots, chopped
1 bunch dandelions or other yummy greenness, chopped
You can put any kind of vegetables that you like into this dish and it will be awesome: mushrooms, asparagus (the season is coming soon- AWESOME!), snow peas, whatever floats your boat.

For the sauce:
the juice of one lemon
1 tbsp soy sauce or Bragg's Liquid Aminios
2 tbsp miso (I mix red miso with mugi miso, but it's all a matter of taste)
1 tbsp rice vinegar
1 tbsp agave nectar
1 tsp diced ginger (if you have a garlic press, run your ginger through it, you will be thankful. Trust me.)
red pepper flakes to taste

So... You're ready to cook! Grab yourself a large wok or iron skillet, heat your oil to medium. Add your sesame seeds, onion and garlic. You might want to splash some soy sauce in at this point. Once your onions begin to sizzle, add your tofu and stir. Meanwhile, boil your noodles. I like to cook my tofu for as long as the noodles cook: it makes it crispy and yummy. You can splash some soy sauce in at this point for browning purposes. Add your carrots. When your noodles are done, strain them. In the strainer, drizzle them with soy sauce first and then some cooking oil. Add your noodles to your wok/skillet and stir well. While your noodles fry, mix together all of your sauce ingredients (don't forget to stir them, though). Miso is sometimes hard to dissolve, I stir it with a fork and that helps. When the sauce is ready, throw your greens into your noodles and stir well. Reduce heat to low and pour your sauce over your nooodles. Stir well and chow down. It's hard not to eat seconds and thirds.

I serve this with a generous side of steamed collards or kale. It is so so so yummy!!!!

Sunday, January 15, 2012

Jambalaya with Homemade Seitan!

Note: I apologize for the lack of pictures in this post, but somehow I had technical difficulties that prevented me from being able to upload them properly.


Back in college, I used to make this dish every time there was a party. I used to make it with spicy sausage and shrimp, but that's not going to happen anymore (since now that I'm older, I'm also smarter). These days, I make it with soysausage and seitan. If you've never tried seitan, you should. I've never found anything that works so well as a meat substitute. My local grocery store does not carry seitan, so I make my own (way more adventurous anyway). If you have a gluten sensitivity, do not eat seitan. It's primary ingredient is wheat gluten. For seitan, you will need:

1 cup vital wheat gluten (I use Bob's Red Mill)
3 tablespoons nutritional yeast
the juice of 1/2 lemon
1/2 cup water or vegetable broth
1 tbs olive oil
the spices of your choice (match the flavors with what ever you're making)

Mix the vital wheat gluten and the nutritional yeast together in a mixing bowl. Add the wet ingredients and knead for about 5 minutes. The dough should be elastic and roll into a ball or a loaf easily. Now, bring 2 1/2 -3 cups of vegetable broth to a boil and place your dough ball in the water. Lower the heat to a simmer and allow the dough to simmer for 30 - 45 minutes. When you remove the dough, it will be lovely and brown. Let it cool and cut it into bite-sized pieces.

To make my delicious jambalaya,  you will need:
2 cups brown rice
1 strong onion, chopped
4 cloves garlic, diced
2 tbs olive oil (or other oil that you cook with- one tablespoon for your onions, one for your sausage)
The seitan you just made (or if you use store-bought, use one package)
1/2 package Lightlife soy sausage (or other kind of soy sausage)
2 or 3 stalks of celery, chopped
1 can of diced tomatoes (you can use fresh, too, I've done both)
1 cup vegetable broth
1/2 cup ketchup
Tabasco sauce, cayenne pepper, thyme and parsley to taste

Get yourself a large soup pot and warm up your oil (put it at about medium). Add your onions and your garlic. Saute them until they are translucent. In a frying pan (I use my trusty old iron skillet), warm up your other oil and begin to crumble your sausage and seitan into it. You may need to add water to help the browning process. You can add spices to the meaty mix- I added some cayenne and mixed Cajun spices. While that browns, pour your rice over your onion mix and mix it around. Next, add your tomatoes and vegetable broth. Let the rice mixture simmer. Once your meaty mix is nicely browned, pour it into the rice mixture. Add your celery, ketchup and spices. You may need to add some water / vegetable broth. Allow it to simmer until the rice is tender (about 45 minute) and serve with crusty bread and a green salad! Yummy!!!!


Monday, January 2, 2012

Miso Noodle Soup

Happy New Year!!!!

Noodle soup is something that is beautiful and wonderful and easy to make! This particular soup is my absolute favorite and it will make you feel wonderful. The combination of miso and seaweed will bring you magic and health.

For this soup, you will need:

1 tbs oil (sesame oil is great for this soup, but use what you're got)
1 onion, chopped
1/2 package of tofu
1/2 package of noodles (I use whole wheat fettucini, but soba noodles are good too)
1/2 c dried wakame or arame (you can make this if you don't have seaweed, but it will not be as wonderful)
1/2 c dried shitake mushrooms (you can also use fresh mushrooms and they don't have to be shitakes)
1/2 inch piece of ginger
2 or 3 tbs miso paste (I use a combination of red miso and barley miso, but use whatever floats your boat- the lighter a miso paste is, the sweeter it will taste, the darker it is, the saltier it will taste)
the juice of 1/2 lemon
chopped parsley, to taste
6 c water
Note: Feel free to add more vegetables like celery, broccoli, kale, parsnips, whatever makes you smile.


Press your tofu. Tofu is better if you can get the water out of it before cooking. To do this, place your block of tofu on a plate and place a similar plate on top of it. Now, put something kind of heavy (I use a tea kettle, half full) on top of your second plate- be careful that you have something that won't fall off and leave pieces of itself all over the floor. This is the voice of experience. Go ahead and chop your vegetables while your tofu is pressing. Heat your oil in a large soup pot on medium and add your onions. While they are getting warmed up, get your tofu out from between the plates and chop it into bite-sized squares. Add your tofu to the onions and saute until tofu is lightly browned and onions are translucent.


Now, add your water, mushrooms, carrots, and wakame. Let this boil for about 5 minutes and simmer for as long as you like. If you're very hungry, go ahead and cook your noodles (boil for about 8 minutes). Drain your noodles and pour them into your soup. You are ready to add your miso when the seaweed and mushrooms are soft. To add the miso, dip out about 1 cup of broth from your soup. Place the paste into the water and let it soften. While it softens, you can either chop your ginger very finely or press it through a garlic press and add it to the miso mixture. When the miso is soft (it takes varying times, depending on the type of miso you use), stir it around with a fork until it has mixed well with the water and then pour it into the soup. Take care not to boil your miso, as boiling will kill the enzymes and you won't get the groovy benefits of eating miso. To finish the soup, squeeze your 1/2 lemon on top and add your chopped parsley. Feel free to eat many many many servings. It's fantastic!

Also, coming soon: Homemade pasta noodles and kombucha with your own scoby!

Tuesday, December 27, 2011

Weeds!

So, we're about to get personal....

I'm going to tell you a secret.

I like to eat weeds. A lot. I know I've posted about dandelions and chickweed in the past, but now is time for the greatest weed of all time. (Drumroll!!!!!)

Were you ever on a walk or playing in the woods, and you noticed a very spiky ball of ugly weediness stuck to your pants, socks, shoes or companion? My dad and I used to pick them off of the ground and throw them at each other for a very countrified game of "catch." That ugly ball is full of seeds for an amazing plant called burdock. Burdock has been used for centuries as a liver and blood cleanser, digestive aid and a vegetable. The plants will grow anywhere (and everywhere!). They are commonly called "elephant ears" because their slightly fuzzy green leaves are very large. The seeds and leaves are also edible, but I love their roots! My love affair with burdock began in my late teens when I read Susun Weed's book Healing Wise. Once I tasted burdock, I was a goner! I loved digging up burdock where ever it could be found. Burdock has a deep, earthy flavor. It will make you feel amazing.

If you're really adventurous, you can dig your own. Don't dig burdock from the side of the road or any other place that might have pollution-yuckiness. You'll have to use a large shovel, because these kids get really long. Burdock is a biennial, which means that it grows for two years. It's best to get your burdock its first year. First-year burdock is easy to identify, because the second-year burdock will have a large stalk growing from its center, sporting the aforementioned ugly seed pods. Wash it really well.

If you're not really adventurous, you can purchase burdock (also called Japanese gobo) seeds from most seed distributors.

If you're not adventurous at all, go to your local Asian grocery. They will call it "gobo." If they don't have it, open your mouth and ask. I bet they will order it for you.

Now that we've found some, let's cook!

For Burdock and Carrot Kinpira, you will need:

2 long (or 4 short) stalks of burdock, cut into 1 inch pieces (I split it down the middle with a large knife and then chop it at an angle- it's prettier)
3 medium carrots, cut into 1 inch pieces
1 onion, chopped
1 tbs sesame seeds (I use black, but suit yourself)
soy sauce (or tamari, shoyu, Bragg's liquid aminos)
1/2 inch piece of ginger
the juice of 1/2 lemon
a few sprigs of parsley, chopped
1 tsp sesame oil (or other good cooking oil)

Note: You can peel the burdock and carrots if you want to. I just wash mine really well. I generally don't peel vegetables, unless it's absolutely necessary (like when the peel is inedible). If you do chop them, don't throw them down the garbage disposal- put them in your compost pile, please!

Get a large skillet or wok. Pour in your sesame oil and put your burner at medium heat. When the oil begins to heat, pour in your sesame seeds and toast them (they might puff up). It helps to keep the sesame seeds moving as you're toasting them. Next, add your onions. Drizzle with soy sauce. Saute the onions until they soften, then add your burdock. Drizzle with soy sauce. Next, add your carrots and drizzle with soy sauce again ("drizzle" means a couple light shakes of the bottle). If the vegetables get too dry in the pan, add a couple tablespoons of water. Saute for about two minutes, and then lower the heat to low and cover. Let the veggies stew for about 10 minutes. If you want it to taste sweeter, let it cook longer.
To finish, you can either grate your ginger, or press it through a garlic press. Toss the vegetables in the ginger, add your lemon and chopped parsley, and you've got dinner! Root vegetables are particularly good for you in the winter, because they help to keep you warm!

Serve over rice, maybe some fried tofu and a side of steamed greens... Be a grown-up and eat your weeds!

It's Been Way Too Long!!!!

So sorry for the several month long hiatus! For the end of 2011 and beginning 2012, I intend to revamp Because Cooking is Totally Worth it! Coming soon: Homemade Noodles, Salad Dressing, and desserts galore!

Wednesday, July 13, 2011

Mideast Feast


My love of Middle Eastern food began at a restaurant on South Street in Philadelphia on a really hot summer day when I was in college. I grew up in a pretty conventional home, foodwise, and I tasted couscous and was in love! For our Mideast feast, I made pita bread, falafels, the best hummus I've ever tasted and salad.


Pita bread is surprisingly easy and fun (really!). You will need:

2 1/2 c flour of your choice (I recommend a whole grain variety)
1/4 c ground flax
1/4 c vital wheat gluten
1 tbs olive oil
1 tsp salt
1 tsp sugar
1 packet (or 2 1/4 tsp) active dry yeast
1/2 c warm water (and more for the kneading part)

Note: If you don't have flax or wheat gluten, just use 3 cups of flour. I use the flax to add fiber and moisture. I use the gluten because it helps the bread rise faster, but it' not exactly necessary.

First, dissolve your yeast and sugar in your warm water (water should be bath-like- if it's too hot, it will scald your yeast and kill it). Stir it around and set aside.

Mix your dry ingredients in a medium bowl. Once your yeast is activated (it should be frothy and smell like beer), pour the water into your flour mix. This will not be enough water, you will need to add a cup or so- enough that you can knead the dough into a ball. Knead it four about five minutes. Set it in a warm place (In cold weather, I use my oven. In warm weather, I use the back porch) for about an hour (you can let it sit up to over night).

Preheat your oven to 500 degrees. Once the dough has risen (about as long as it takes you to make the other stuff in this feast), knead it for another 5 minutes. You may need to add a little more flour. Next,  break out your rolling pin. If you're feeling saucy (and who doesn't feel saucy when they have a rolling pin in their hands?), chase somebody around your house and pretend that you're going to hit them. When you're done with that, break your dough up into 8-10 little balls. Roll them out on a well-floured surface (I use my cutting board) until they are about 1/4 inch thick.
Place them at the bottom of the oven on a well-oiled surface. When they have been in for about 2 1/2 minutes, flip them over and bake for another 2 minutes.

I was worried that the pitas would turn out like flatbread, but this amazing thing happens in the oven and they just puffed up beautifully!


For the hummus, you will need:

1c chickpeas
1/2 onion
3 cloves garlic
1 tbs dried parsley (if using fresh, use a bit more and make sure you cut it up really well)
1 tsp oregano
1 tsp paprika
2 tbs olive oil

Mix in a food processor and smile at yourself in the mirror for being so awesome! With my old '80s food processor, I have to process the ingredients individually, which is a total pain, but the yum-factor makes it worth it.  If your hummus is lumpier than you would like, add a bit more olive oil.


For the Falafel:

1 can or 1 1/2 c chickpeas
1 onion, chopped
1 garlic clove, minced (if you're a garlic nut, add more. It won't hurt)
1 bunch parsley, chopped well
Juice of 1 lemon
1/2 c whole wheat flour or bread crumbs
add cumin, coriander, cayenne, salt and black pepper to taste

Canola or safflower oil for frying.

Run your chickpeas through a food processor (your food processor is going to be very tired after tonight!), or mash them  really really well. Mix everything together in a medium bowl. I use a large iron skillet for the frying, but a deepish frying pan works well too. Pour oil about 1/2 inch deep into your frying pan and place on medium-high heat. Take your falafel mixture and roll into balls or patties, about the size of the palm of your hand. Once your oil is sizzling, drop your falafels in. Fry for about 3-6 minutes on each side and let cool before serving.

I serve this with a very green salad and I just dump everything into my pita. It's delicious!!!


Saturday, May 14, 2011

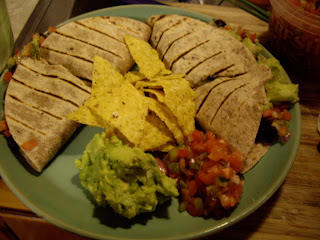
Cheeseless Quesadillas

This is a great dish to feed to non-vegans. You won't miss the cheese, I promise! This is also a great dish to make when you're tired or pressed for time. It only takes a few minutes. Serves 4. You will need:

8 tortillas (I use what ever whole-grain variety that is on special at my local grocery. However, if you want the greatest, but Food For Life's Ezekiel sprouted grain tortillas. They are The BEST!)
1 can refried beans (watch labels. Refried beans are often made with pig lard)
1 can black beans (you can also use home cooked beans- you need about 1 1/2 -2 cups)
1 onion, sauteed
1 container of the salsa or pico of your choice (home made recipe is to come- when the tomatoes in my garden are ready- August-ish)
1 cup guacamole (see 7-layer Bean Dip for recipe for your own)
Any other veggies you like- corn (yes, I do know that corn is a cereal grain and not a vegetable), peppers, mushrooms, I've even put shredded carrots in these and they work.

Stuff your tortillas full of ingredients. It works best if you spread your refried beans throughout the tortilla first, because it helps the other ingredients stick together.
Throw your stuffed tortilla into a frying pan and toast on each side for 4-5 minutes each at medium-high.

Wasn't that fun and easy? Pig out, y'all! There is nothing in this recipe that will make you regret it!